

How to Make Pour Over Coffee at Home for Beginners
Table of Contents
- What You'll Need: Essential Pour Over Equipment
- The Best Coffee Grind Size for Pour Over
- Pour Over Coffee Water Temperature: Getting It Right
- How to Bloom Coffee Grounds
- Step-by-Step Pour Over Brewing Process
- Troubleshooting by Taste: Fixing Your Pour Over Coffee
- Frequently Asked Questions
Last Updated: September 16, 2026
What You'll Need: Essential Pour Over Equipment
Learning how to make pour over coffee at home for beginners starts with four pieces of equipment: a dripper, paper filters, a gooseneck kettle, and a burr grinder. Add a digital scale and you have everything needed for a repeatable, cafe-quality cup. At Gospel and Grind, we roast beans to order because the brewing gear only performs as well as the coffee inside it.
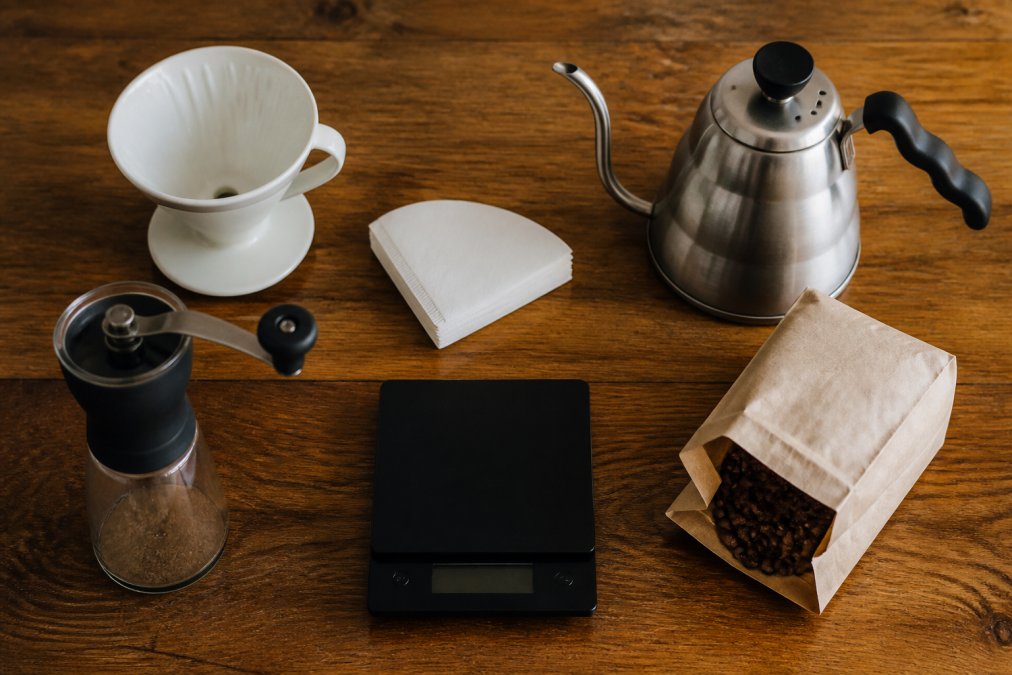
Here's the starter kit:
- Pour over dripper (cone or flat-bottom) with matching paper filters
- Gooseneck kettle for controlled pouring, electric with temperature control if budget allows
- Burr grinder (hand or electric) for even particle size
- Digital scale reading to 0.1 grams, plus a timer
- Fresh whole beans, ideally roasted within the last few weeks
What's Essential vs. What's Optional
Beginners often stall because they think a pour over setup requires a $200 kettle and a $150 grinder. It doesn't. Here's how to think about the spend:
Essential (non-negotiable):
- A dripper and matching filters. A basic plastic cone dripper costs under $15 and brews as well as ceramic or glass for a beginner. Ceramic and glass hold heat better but need preheating; plastic is the forgiving choice for your first month.
- A burr grinder. This is the one place to spend. A hand burr grinder runs roughly $40-$70 and outperforms any blade grinder at any price. If you drink more than two cups a day, an electric burr grinder in the $100-$150 range saves your wrist and delivers the same particle consistency.
- A digital scale. A basic 0.1-gram kitchen scale costs $15-$25. You cannot brew repeatably by volume; weight is the only way to control ratio.
Optional (nice to have, not required to start):
- A gooseneck kettle. A stovetop gooseneck runs $25-$40; an electric temperature-controlled model runs $60-$120. You can start with any kettle and a steady hand, but a gooseneck makes controlled pouring dramatically easier and is the second upgrade most beginners make.
- A temperature-controlled electric kettle. Useful, but a $10 instant-read thermometer and a 30-second rest after boiling gets you in range.
- A server or carafe. Brew directly into your mug if you're making one cup.
The Best Coffee Grind Size for Pour Over
The best coffee grind size for pour over is medium-fine, roughly the texture of table salt. Too coarse and water rushes through, leaving a weak, sour cup. Too fine and the bed clogs, producing bitterness and a slow draw-down. This is the single variable beginners adjust most often, and the one that changes flavor fastest.
Why Grind Consistency Matters
Grind consistency determines how evenly water extracts flavor from each particle. When every ground is the same size, water passes through at a predictable rate and pulls out sweetness and acidity together. When particle sizes vary, small grounds over-extract and turn bitter while large grounds under-extract and taste sour. You get both faults in one cup. This is why burr grinders, which crush beans to a uniform size, outperform blade grinders for pour over brewing.
Pour Over Coffee Water Temperature: Getting It Right
Pour over coffee water temperature should sit between 195°F and 205°F. Most medium roasts brew best around 200°F. Water above 205°F scalds the grounds and pulls out harsh, bitter compounds; water below 195°F under-extracts and leaves the cup flat and sour. If your kettle lacks a thermometer, boil the water and let it rest for about 30 seconds before pouring.
Water Chemistry Basics
Water makes up more than 98% of your finished cup, so its mineral content matters as much as the coffee. Very soft or distilled water produces a dull, lifeless brew because it lacks the minerals that carry flavor compounds out of the grounds. Very hard water over-extracts and tastes chalky. Most tap water filtered through a basic carbon filter lands in a workable range.
How to Bloom Coffee Grounds
To bloom coffee grounds, pour roughly twice the coffee's weight in hot water over the bed, then wait 30 to 45 seconds. For a 20-gram dose, that's about 40 grams of water. The grounds will swell and bubble as trapped carbon dioxide escapes, a process called degassing. Skipping the bloom traps that gas in the bed and blocks even saturation, which is why the first pour of an unbloomed brew often channels straight through.
Step-by-Step Pour Over Brewing Process
Here is the full process for a single 12-ounce cup, using a 1:16 coffee-to-water ratio: 22 grams of coffee to 350 grams of water. Total brew time should land between 2:30 and 3:30. The timing column below is what separates a repeatable cup from a lucky one.
| Step | Action | Target Time |
|---|---|---|
| 1 | Heat water to 200°F | , |
| 2 | Rinse filter with hot water, discard rinse | 0:00 |
| 3 | Add 22 g coffee, level the bed | 0:15 |
| 4 | Tare scale to zero | 0:20 |
| 5 | Bloom: pour 45 g water, saturate all grounds | 0:30 |
| 6 | Wait for bloom to settle | 0:30-1:10 |
| 7 | First pour: spiral outward to 200 g total | 1:10-1:45 |
| 8 | Second pour: once bed drains slightly, pour to 350 g | 1:45-2:20 |
| 9 | Gentle swirl, let bed draw down fully | 2:20-3:30 |
Step-by-Step Detail
- Heat water to 200°F. If you don't have a temperature-controlled kettle, boil and rest 30 seconds.
- Rinse the paper filter with hot water, then discard the rinse water. This removes papery taste and preheats the dripper. Skipping this is the most common cause of a flat, cardboard-like cup.
- Add coffee and level the bed by gently shaking the dripper. An uneven bed causes uneven extraction, some grounds get more water than others.
- Tare the scale to zero with the dripper, filter, and coffee in place.
- Bloom: pour 45 grams of water, saturating all grounds, and wait 40 seconds. The bed should swell and bubble.
- First pour: spiral outward from the center to 200 grams total. Keep the stream slow and steady, about the width of a pencil.
- Second pour: once the bed drains slightly, pour to 350 grams. Avoid pouring down the paper filter's edge; water that bypasses the coffee weakens the cup.
- Swirl gently and let the bed draw down fully. The bed should be flat and even when finished, a crater in the middle means your pour was too aggressive.
Pouring Technique and Motion
Pour in slow, steady circles starting at the center and spiraling outward, keeping the water stream off the paper filter's edge. Pouring down the sides lets water bypass the coffee entirely and weakens the cup. Keep the water level consistent and avoid dumping large volumes at once, which disturbs the bed and causes channeling, where water finds a single path through the grounds instead of saturating evenly.
Total Brew Time and Draw-Down
A well-executed pour over finishes between 2:30 and 3:30, including the bloom. Draw-down time, the final stretch as water pulls through the bed, should take roughly 45 to 60 seconds on its own. A brew that finishes under two minutes usually means the grind is too coarse. One that drags past four minutes points to a grind that's too fine or a clogged filter.
| Taste Problem | Likely Cause | Fix |
|---|---|---|
| Sour, weak, thin | Grind too coarse, water too cool | Grind finer, raise temperature |
| Bitter, harsh, dry | Grind too fine, water too hot | Grind coarser, lower temperature |
| Flat, dull, lifeless | Stale beans or soft water | Use fresher coffee, filtered water |
| Uneven, some sips sour some bitter | Poor grind consistency or channeling | Switch to a burr grinder, pour more evenly |
| Brew finishes too fast | Grind too coarse | Adjust grinder one step finer |
Troubleshooting by Taste: Fixing Your Pour Over Coffee
Troubleshooting by taste is the fastest way to improve your pour over coffee, because your palate identifies the problem before any measurement does. Sour and thin means under-extraction: grind finer or raise water temperature. Bitter and drying means over-extraction: grind coarser or lower the temperature. Flat and papery usually points to stale beans or a filter that wasn't rinsed.
Frequently Asked Questions
What is the ideal water-to-coffee ratio for pour over?
For pour over coffee, start with a 1:16 ratio, meaning 1 gram of coffee to 16 grams of water. For a standard 8-ounce cup, use about 15 grams of coffee and 240 grams of water. You can adjust to taste: use more coffee for a stronger cup or less for a lighter one. A digital scale helps you measure accurately and consistently, which is key to repeatable results.
Do I need a gooseneck kettle for pour over coffee?
A gooseneck kettle gives you precise control over your pour, which helps with even saturation and extraction. It's not strictly required, but it makes a noticeable difference. If you don't have one, you can use a regular kettle with a spout that allows slow, steady pouring. Just pour carefully in small circles to avoid channeling. Many beginners find that a gooseneck kettle is a worthwhile upgrade for better consistency.
How does grind size affect the taste of pour over coffee?
Grind size controls how fast water flows through the coffee and how much flavor is extracted. A medium-fine grind, like table salt, works best for pour over. Too coarse and the water passes too quickly, leading to sour, weak coffee. Too fine and the water slows down, causing bitter, over-extracted flavors. Adjust your grinder one notch at a time until you hit the sweet spot for your taste.
What is the bloom in pour over coffee and why does it matter?
The bloom is the first pour of hot water onto the coffee grounds, which releases trapped carbon dioxide. This gas can block water from evenly extracting flavors, so letting the coffee bloom for 30-45 seconds allows the gas to escape. You'll see bubbles and swelling. Skipping the bloom can result in uneven extraction and a less flavorful cup. It's a simple step that makes a big difference in taste.
How long should the total pour over brewing process take?
The entire pour over process should take about 3 to 4 minutes from the moment you start pouring to when the water finishes draining. This includes the 30-45 second bloom. If it's much faster, your grind is too coarse; if it takes longer than 4 minutes, your grind is too fine. Adjust your grind to hit that window, and you'll get a well-balanced cup.
What are the best coffee beans for a pour over brew?
Freshly roasted, single-origin beans with a medium or medium-light roast work best for pour over. They highlight the bean's unique flavors without overwhelming them. Look for freshly roasted beans for optimal freshness. Gospel and Grind's Colombia single-origin, with notes of dried orange, berry, and chocolate, is an excellent choice for pour over. Their Ethiopia Natural offers milk chocolate, fruity, and caramel notes that shine in this method.